Capturing Spherical Scenes from Google Streetview
Update 8/27/17: Check this out: Thomas from the Czech Republic wrote me with his new app (his first!) that takes care of it all, on Mac or Windows. Visit istreetview.com, and navigate the familiar Google Streetview interface to find your pan, and the appropriate Pano ID. Up at the top right is a “Download 360°” link – which will take you to download his app. From there, copy and paste the Pano ID code into the app, pick a destination for your file, and download. That’s it! It even handles some of the pan formats I’d been having trouble grabbing.
Update 8/20/15:AHA! So a lazy evening taking a look at Google Maps API examples again, and I’ve sussed out a way to display the PanoID as you move around the map. Take a look and don’t mind the ‘undefined’ when you first load. As soon as you move to a new location, it’ll get replaced by the PanoID.
As I’ve mentioned in the comments below, there are some panos that just won’t work and will return black frames. These appear to mostly be user-submitted panos. Scenes from the Google Car generally seem to work.
In other words, I should probably heavily edit this post someday.
Update 7/23/14: If you look carefully around the new Google Maps, there is an option for “Return to classic Google Maps” so all is not lost. There are probably some ways of doing this with the new Maps also, but I haven’t sorted out a simple way yet.
Update 3/24/14: Well, it appears that the new version of Google Maps uses URLs that make it harder (if not impossible) to discover the individual tile addresses – so this has as far as I can tell stopped working. I’ll poke around and see if there’s something new in the Maps API, but for now, I think this doesn’t work anymore. Phooey.
—
A couple weeks ago, I had the task of turning our dome into the inside of the TARDIS from Doctor Who. (Planetariums are bigger on the inside too, right?) A few days before I had stumbled on this awesome Google Streetview easter egg that puts you right inside the control room of the blue box itself. Step inside and take a look around!
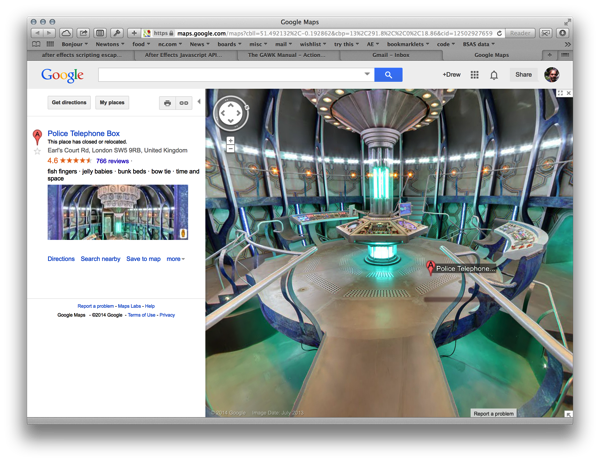
There are some really nice, high resolution spherical views in there, and I want to get at that data. But how?
WARNING: Google Streetview images aren’t yours. They’re Google’s. The way I read their fine print, don’t sell it, don’t charge for it and it’s probably fair use, and Google has bigger fish to fry anyway. But please read for yourself and stay out of trouble.
When you load up any Streetview scene, your browser is working behind the scenes downloading dozens of individual .jpg image tiles and assembling them into a spherical scene. And, as it turns out, you can download the individual tiles yourself and assemble them into an equirectangular projection like so:
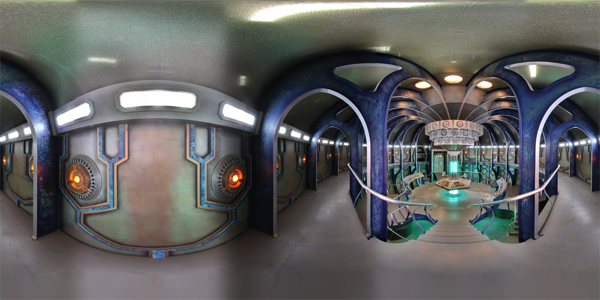
An intriguing individual tile, at full size:

Software
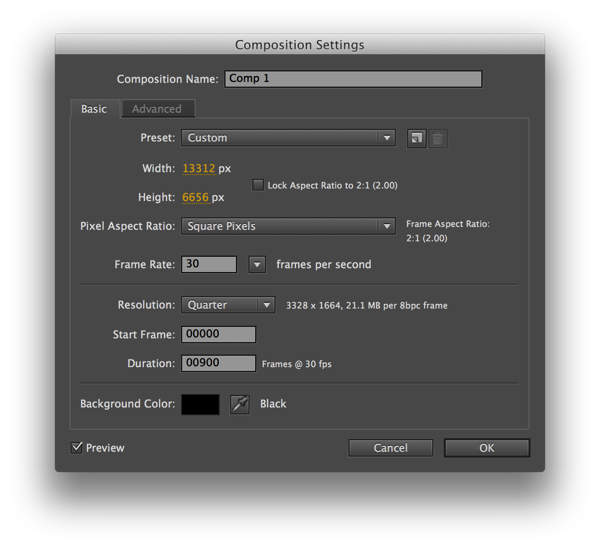
Before we go any further, I should say that if all you’ve got is a web browser and Photoshop, you can do this but it will take a ridiculous amount of time and effort. In this demonstration I’ll be using a cross-platform command-line tool called cURL to do the downloading, and Adobe After Effects to do the stitching. As with many things, There Is More Than One Way To Do It. If you’re handy with the command line and scripting, and don’t have After Effects you might try ImageMagickfor the stitching. Your final equirectangular image will be 13312×6656 pixels in size, so make sure you have a computer up to the challenge.
Grabbing the Tiles
Each tile has its own unique URL, and to find it you’ll first need to examine the URL for the whole panorama itself. Don’t look in the browser address bar; that address won’t necessarily change as you wander around Streetview. Instead, once you’ve navigated to the scene you want to grab, click the link button in Google Maps’ sidebar:

Copy the URL and paste it in a text editor. Like in many big long URLs, various chunks of data are separated by “&” characters. We’re looking for a particular chunk of data called “panoid”, the unique ID of the panorama.
https://maps.google.com/mapshl=en&ll=51.492139,-0.192883&spn=0.004703,0.008422&sll=51.492140,-0.193028&cbll=51.492159,-0.192966&cbp=13,291.8,,0,18.86&cid=12502927659667388442&gl=US&layer=c&panoid=lKxUOImSaCYAAAQIt71GFQ&t=m&z=17
The code in bold is the bit we need, everything between panoid= and the very next “&” character.
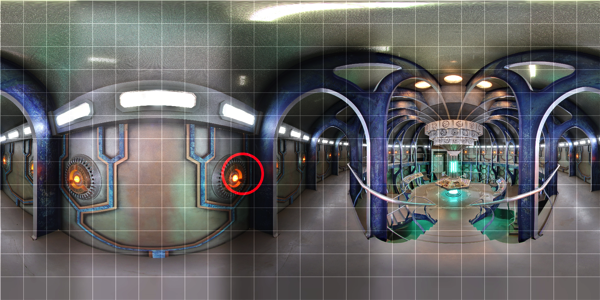
In a typical Streetivew scene, there are 338 tiles (each 512 pixels square) that will make up our equirectangular view. The top-left corner has coordinates (0,0), and the lower-right corner is (25,12). The unique URL for the tile eleven columns from the left and eight rows down is:
http://cbk0.google.com/cbk?output=tile&panoid=lKxUOImSaCYAAAQIt71GFQ&zoom=5&x=10&y=7
Notice the coordinates are denoted in the string &x=10&y=7. Remember we’re counting from zero, so the eleventh column is numbered 10, and so on. You can click the link here to see a now-familiar looking tile. Here it is in the context of the whole image:
You could download and save each and every tile that way, just by typing the URL into the browser and changing the coordinates each time. That would be nuts. Let’s use cURL and get them all downloaded in about a minute. (Your bandwidth may vary.)
cURL is a command-line tool for downloading internet content. If you have a modern Mac or Linux system, you probably already have cURL. If you don’t have it, or you have a Windows system, start at the cURL Download Wizard to direct you to the correct version. Here’s another page with some useful tips for cURL on Windows. I haven’t messed much with cURL, especially on Windows. Get to know it before moving on…
The following cURL command will download every tile, column by column, row by row:
Mac / Linux:
curl http://cbk0.google.com/cbk?output=tile\&panoid=lKxUOImSaCYAAAQIt71GFQ\&zoom=5\&x=[0-25]\&y=[0-12] -o "tile_#1-#2.jpg"Windows:
curl http://cbk0.google.com/cbk?output=tile^&panoid=lKxUOImSaCYAAAQIt71GFQ^&zoom=5^&x=[0-25]^&y=[0-12] -o tile_#1-#2.jpg[0-25]and[0-12]iterates through the column and row numbers.--o "tile_#1-#2.jpg"outputs the file with the filename starting with “tile_” and ending with the coordinate numbers.#1corresponds to the first range of numbers,#2to the second.- Notice that any
&characters in the Google URL are now preceded by a backslash (or a caret in Windows) to avoid confusing your command-line environment, which otherwise would treat ampersands as special characters.
Run that command and very quickly you’ll end up with 338 image files, with names like these:
tile_0-0.jpg
tile_0-1.jpg
tile_0-2.jpg
tile_0-3.jpg
tile_0-4.jpg
tile_0-5.jpg
tile_0-6.jpg
tile_0-8.jpg
tile_0-9.jpg
tile_0-10.jpg
tile_0-11.jpg
tile_0-12.jpg
tile_1-0.jpg
tile_1-1.jpg
tile_1-2.jpg
tile_1-3.jpg
... and so on, until
tile_25-10.jpg
tile_25-11.jpg
tile_25-12.jpg
Assembling the tiles
You can manually stitch the images in Photoshop. It’s straightforward, but really slow and laborious. Depending on the content, automatic stitching software like Hugin might work (I haven’t tried it.) Experiment and see what works best for you. I will describe how to do it really quickly in Adobe After Effects.
- Create a new project in After Effects, and make a new composition, 13312×6656 in dimension with square pixels.
- Import all of the tiles into After Effects. Either drag them into the project pane, or select “Import File…” from the File menu.
- In the project pane, make sure that the images are sorted by name, in ascending order.
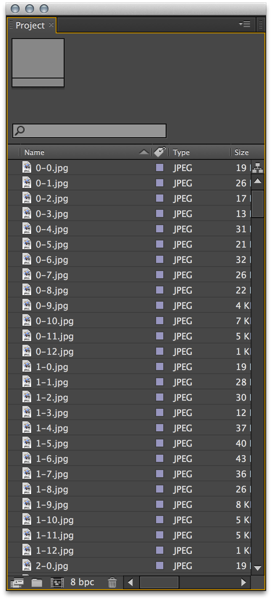
- Select all the image tiles in the project pane, and drag them into your composition. They should appear in the timeline in the same alphabetical order. There should only be tile images in this comp, nothing else.
- We’re going to add an expression to the position property of every tile. If you’re not familiar with expressions, this link will give you the very basics to get started.
- Select the topmost tile in the comp and press P to reveal the tile’s position properties. Hold down the alt (Win) or option (Mac) key and click the stopwatch icon. An area opens up on the timeline ready for you to type in an expression. Paste in the following code:
n=Math.floor((index-1)/13); [512*n+256,512*(index-(n*13))-256]
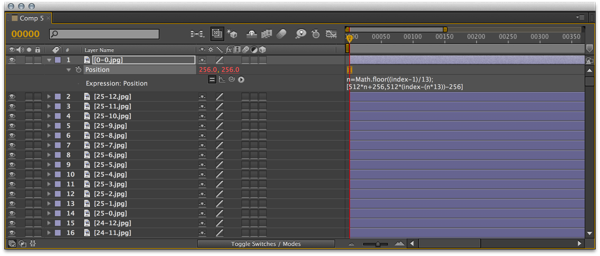
- Now, to copy that code to every tile. Click on the label “position” on that first tile. From the menu bar, select Edit->Copy.
- Select every tile layer in the composition. Select Edit->Paste. This will paste any position data, including the expression, to every layer you selected. If you’ve been successful, all the tiles should move to their proper position relative to the composition.
The expression code looks at the layer number, or “index,” of each tile, and calculates the correct position of the tile based on that index, knowing that there is a grid of 26×13 tiles, and assuming that they are arranged in the timeline in proper alphabetical order.
You can export that single image from After Effects by selecting Composition->Save Frame As…, which will add it to the Render Queue, and from there you can select what format to save it as. Make sure it’s set to “Full Quality” in the render settings if you want the full 13312×6656 dimensions.
From then on it’s a matter of turning that equirectangular view into a dome master, and there are too many ways to do that to mention here!
Hope that made sense…
I hope you may find this useful. Please leave comments below if something here needs clarification! I tried to balance between keeping everything step-by-step and not getting too deep in the woods with details.
Hi,
I just went through your write-up and did this successfully after a small modification. I’m on windows so I used that command, however I had to remove one of the hypens from the “o” argument and also remove the quotation marks from the output filename. Also, I wanted to let you know that I wrote about your technique on our Dome Club website, check it out!
Aah, thanks! I’ll make that edit. And thanks for the write up :)
Is it still usefull this tutorial? I mean, I don’t see any option for “Return to classic Google Maps”.
Hi Marco,
When I look, I see a little question mark icon down in the lower right corner. Click that for a menu that has a link to the classic maps.
Hi,
Any software available to download panoramic images from google street view?
I don’t think there’s anything commercial; Google doesn’t really want anyone scraping vast amounts of data at a time, at least not without paying up. But if you wanted to do more than just a few scenes, you could start messing with Hyperlapse.js. I can’t say I fully understand it, but maybe some combination of that and what I’ve outlined above might get you somewhere.
Thanks a lot!
Hi,
I’m having a problem with cURL. It only downloads three of the files, and then it just says “Could not resolve host http:21http” between the other files. Anybody knows what’s wrong?
Ok so I got the files to download but none of the files will open properly. Looks like they’re corrupt or something. Help please :)
Hm. Can you post the cURL command you’re using? I can try to look at it later tonight. Win or Mac?
“curl http://cbk0.google.com/cbk?output=tile^&panoid=WzWuko5mobPPDrXRgTme3A^&zoom=5^&x=[0-25]^&y=[0-12] -o tile_#1-#2.jpg” (without the quotation marks) is the command I type in order to get the image files downloaded. But Windows Photo Viewer keeps telling me that the file format is not supported, even though they’re all jpegs. I can neither open the files in Photoshop nor MS Paint. I think the problem may be in cURL, but no matter what version I try, the problem still occurs.
I’m not much of a Windows person, but I tried it at work and your command as posted did work. So that also makes me think it’s something with your install of cURL.
For what it’s worth, this is what I get from typing curl -V to get the version string on that PC:
curl 7.34.0 (i386-pc-win32) libcurl/7.34.0 OpenSSL/1.0.1e zlib/1.2.8 WinIDN libssh2/1.4.3
Protocols: dict file ftp ftps gopher http https imap imaps ldap pop3 pop3s rtsp
scp sftp smtp smtps telnet tftp
Features: AsynchDNS GSS-Negotiate IDN IPv6 Largefile NTLM SPNEGO SSL SSPI Liz
To troubleshoot, you might see if you can download any regular (non-google) image file from the web… “curl http://www.newtonscannon.com/wp-content/uploads/2014/01/AE-newcomp1.png -o test.png”
I can download that image. I thought maybe it had something to do with the file format, but it still doesn’t work after changing the filename extension to .png.
Don’t know. As far as I know all the google streetview tiles are .jpg, so changing extension shouldn’t be necessary… beyond that I can’t really think of any suggestions.
I’ll look around and see if I can get it to work. I’m sure it’s just a small error. Thanks for your help :)
Hi There,
Thanks Drew for taking the time to put together this great tutorial, its been really helpful.
I’ve ran into a strange problem:
I am trying to pull the tiled images from a google sphere / view (https://www.google.com/maps/views/home?gl=us) rather than from streetview, however the process should be the same.
First of all I struggled to find the Pano ID. I had to open up developer tools, go into ‘console’ and move around the image, to generate the URL for each of the tiles which then contained the Pano ID reference for the whole scene.
I’ve ran this through the CURL command, however it seems to only be fetching 1kb Jpeg images tiles with nothing but black.
I’ve tested the curl command with your tardis example and it fetches all the tiles with no problems. So I don’t think the problem lies with the Curl command or terminal on the mac.
Here is the script I am running:
curl http://cbk0.google.com/cbk?output=tile\&panoid=36AdGd8CYgAAAAQYk38jCQ\&zoom=4\&x=[0-25]\&y=[0-12] –o “tile_#1-#2.jpg”
I noticed that the ‘Zoom=5’ level was different to that shown in the URL for the individual tiles for my scene, so I tried changing this to ‘Zoom=4’, however I’m still getting the same blank tiles downloading.
Has anyone else has had similar results, or knows why this may be happening?
Any help would be much appreciated! Thanks in advance.
Josh.
Yeah, I’ve noticed that with mostly user-submitted panoramas that this doesn’t seem to work. It’s interesting that there’s a PanoID at all if they work differently than the rest of the streetview scenes. Unfortunately I may not be much help on this one, but I’ll try to take another look…
This is interesting:
http://googlewebcomponents.github.io/google-streetview-pano/components/google-streetview-pano/
But I can’t find a Google Views url that matches that format, other than the posted example…
Thanks for your work. I find it well explained and very useful.
In After Effects I find all files sorted alphabetically rather than numerically (That is 0-10 comes BEFORE 0-2), with all the consequent mess. I have W7 and I modified the registry in order to get files sorted numerically instead than alphabetically: well, it worked for the way files get sorted in windows, but not in the AE project pane. How do I have to do? Otherwise: I tried using Image Magick, too but it seems there is a problem in assembling more than 10 10 tiles. (Not to mention that IM normally assemble tiles from left to right raw after raw and not column after column)
Problem solved!
– modifying the cURL command syntax from [0-25] and [0-12] to [00-25] and [00-12] I added leading zeros wherever needed
– to assemble the 338 tiles column-after-column in Image Magick I used the following command
montage tile_*-*.jpg -tile 1×13 -geometry +0+0 miff:- | convert – +append equirectangular.jpg
Thank You, anyway. I found your description very useful to find where tiles are stored, anyway.
Ahh, thanks for discovering that, something I did not know about cURL…
Hi,
first of all: Thanks for that awesome article. Makes fun to play around with all that. ;)
I’d like you to know how I put the 338 tiles together with GraphicsMagick (a fork from ImageMagick). So, I only need to use two commands in my terminal to do the whole job for me.
(Sidenote: I am working on MacOS. Should work the same on Unix / Linux.)
———
1) Download all tiles from Street View.
Please mention that I slightly changed the command for my needs:
curl http://cbk0.google.com/cbk?output=tile\&panoid=lKxUOImSaCYAAAQIt71GFQ\&zoom=5\&x=[00-25]\&y=[00-12] -o “tile_y#2-x#1.jpg”
You may see that I start the sequences for x and y with “00” instead of “0”. I also changed the order of x and y in the output filename (for better seeing what I mean, I prefixed “#1” and “#2” in the output filename with “x” and “y”).
So, why am I doing this?
Since GraphicsMagick (as you will see below) composites the tiles line by line and not column by column. Also, GM loads each tile by natural sorting order from filesystem. That’s why the y index comes first, followed by x index in the output filename. And thats why I need the leading zero for the tile numbers, respectively the tile indices.
———
2) Composite all downloaded tiles to one picture.
This is an easy one. Just invoke the following command (ensure GraphicsMagick is installed!):
gm montage +frame +shadow -tile 26×13 -geometry 400×400+0+0 tile_*.jpg tardis.jpg
You can also pass other geometry parameters to the command for changing the resulting size. See link to “gm montage” page below.
———
3) That’s it.
There is no 3). ;)
———
If you need to use ImageMagick because you don’t have GraphicsMagick you might consider the following link:
http://www.imagemagick.org/script/montage.php
This should be very similar (if it’s not even the same) to GM:
http://www.graphicsmagick.org/montage.html
———
Thanks again for sharing your knowledge. This is all I can give you in return. :)
Awesome, can’t wait to try this, thanks for sharing! (Man, do I need to rewrite this post!)
Drew
After re-reading my own comment I see that there is a little hazzle in my explanation what I adapted the curl command for and why it’s useful to let the tile’s y-coordinate come first in the filename. I hope the point is clear anyhow. … It’s about natural order of all tile files. ;)
Sorry for my hopefully not too bad English. :)
Arvid
I wrote a guide for Tabletop Simulator on Steam about how to capture the scene from Streetview for usage in “TTS”. Basically it’s the same I already wrote in my first comment above and of course the same you have written. :-)
I also linked to this article. If you want to rewrite it some day let me know so I can update the link in my guide.
http://steamcommunity.com/sharedfiles/filedetails/?id=588215919
Cheers.
Nice! Thanks for sharing and giving credit :)
Hello Drew. This tutorial is pretty awesome. Really thanks for that. =)
Hi, thanks for this! the lazy way of 3D mirror balling :)
I took your math and made a little AFX script that saves the time of copying and pasting the expressions in the position of each layer. Just put all the images in the correct order in a fresh comp, select the comp and run the script (put the text below into a script file first of course:
{
var scriptName = “StreeviewStitcher”;
app.beginUndoGroup(scriptName);
function StreetviewStich(thisObj)
{
var activeComp = app.project.activeItem;
var numLayers = activeComp.numLayers;
for(i = 1; i<=numLayers; i++){
var n=Math.floor((i-1)/13);
activeComp.layer(i).property("Position").setValue([512*n+256,512*(i-(n*13))-256]);
}
app.endUndoGroup();
}
StreetviewStich(this);
}
Awesome, thanks!
I’ve tried to download many google map panorama links but it downloads only black images,
this link is an example :(
https://maps.googleapis.com/maps/api/streetview?size=640×640&pano=MDCE5h7xISQAAAQYHnPf2A&fov=90&heading=56.14201817402452&pitch=-27.17703700718215&key=AIzaSyDNk_a2rWNWQ3boYF1JkofbudJCsvCv-d0
curl http://cbk0.google.com/cbk?output=tile^&panoid=MDCE5h7xISQAAAQYHnPf2A^&zoom=5^&x=[0-25]^&y=[0-12] -o tile_#1-#2.jpg
Any other way to download?
Thank you.
So this is interesting. Google (somewhat irritatingly) has several methods for delivering spherical scenes and I don’t think I’d seen this one before.
If you look at your example tile, the format of the url is totally different – there’s ‘pano=’ instead of ‘panoID’, and the individual tile isn’t an x-y coordinate in a grid, rather the link specifies a field of view, a heading, and a pitch. So that’s why it’s not going to work with this particular curl script.
One could *probably* write a sequence to spin the camera around and get all the angles, but even then they wouldn’t stitch together into an equirectangular view.
Can you post a link to the interactive view?
http://www.ycdivfx.com/product/panorama-extractor/
To vfxguy:
Thank you. I just bought it (Panorama Extractor) and it works well.